Use the Username and Password we emailed you after purchasing the hosting plan to log in.
After logging in successfully, you’ll see the main WordPress interface in all its glory:
Use the Username and Password we emailed you after purchasing the hosting plan to log in.
After logging in successfully, you’ll see the main WordPress interface in all its glory:
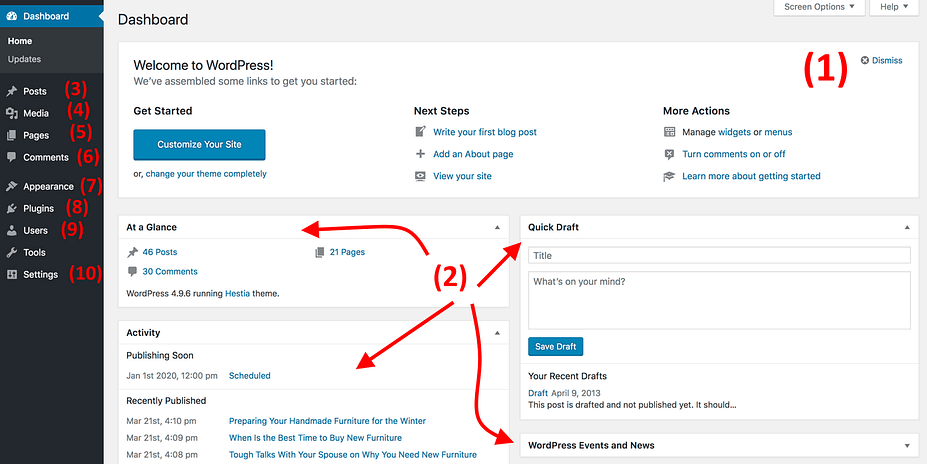
(1) Welcome message – Some of the most important areas of the admin panel listed as quick shortcuts links – these are usually your shortcuts to how to make a website.
(2) The current status of your site and what’s going on with it.
(3) Posts – go here to create blog posts.
(4) Media – upload/manage images and other media files here.
(5) Pages – go here to create sub-pages.
(6) Comments – this is where you can moderate comments.
(7) Appearance – change your site’s design here and/or customize how certain things are displayed on the current design.
(9) Users – manage user accounts that can access the admin panel of the website.
(10) Settings – the main settings.
At this stage, it’s good to take care of some basic getting-started WordPress settings that will improve your experience further down the road.
a) Set permalinks
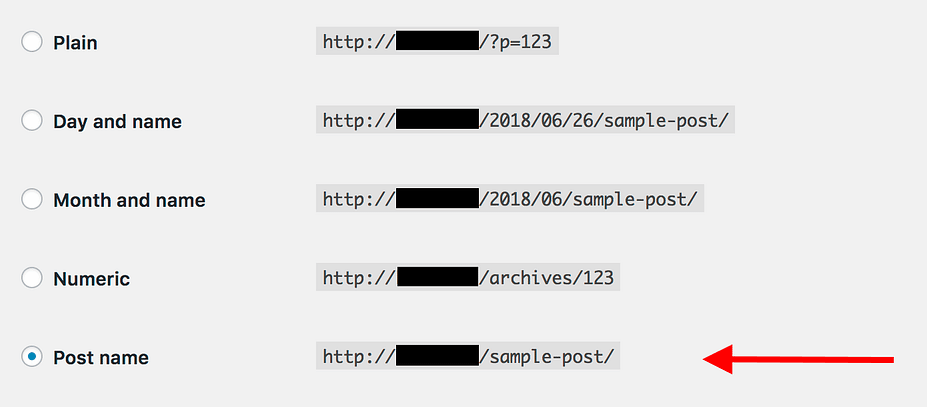
Permalinks define how the individual web page addresses – aka URLs – are structured within your site.
The most optimized structure is to have the page’s title in the URL. For example, your “about” page (more on that page later on) should be available under something as simple as YOURWEBSITE.com/about. Setting the permalinks correctly will allow you to achieve that.
To set your permalinks, go to Settings → Permalinks from the main sidebar in your WP dashboard.
Once there, select this setting:
b) Making your site public
I guess you want Google to be able to find and index your website. To make sure that’s the case, go to Settings → Reading, and make sure that the box labeled “Discourage search engines …” is unchecked.

c) Set your website title and tagline
Go to Settings → General and set the Site Title and Tagline fields to what you want.
Your site title and tagline might appear in various places throughout the site. Some WordPress themes display those on the homepage and in the SEO description – which Google uses when listing your website on the results pages.
The tagline is optional – you can leave it blank if you don’t have a tagline for the site.
d) Allow or disable comments
Whether or not you want to accept comments on your website is up to you.
On the one hand, letting readers leave their opinions and questions under your articles/pages can be great for building a community around the website. But, on the other, you’ll also have your hands busy dealing with spam and making sure that there’s no trolling.
Whether you’ll end up allowing or disabling comments, it can be done in Settings → Discussion.

e) Disable pingbacks and trackbacks
I don’t know why this setting is even still in WordPress. It’s mostly a leftover from back in the day when pingbacks and trackbacks were a thing.
Though, if you want to learn how to make a website in this day and age, you can simply deactivate them by deselecting the following setting in Settings → Discussion.

f) Set your time zone
Setting your time zone correctly will make publishing new pages and posts more predictable.
Generally, you want to set the time zone to either where you’re at or where your target audience is at. Whichever makes more sense.
You can set the time zone in Settings → General.
With the basic settings out of the way, we can get to the fun stuff:
The great thing about WordPress is that it works with interchangeable designs – called themes.
Meaning, you can switch the way your WordPress website looks with just one click.
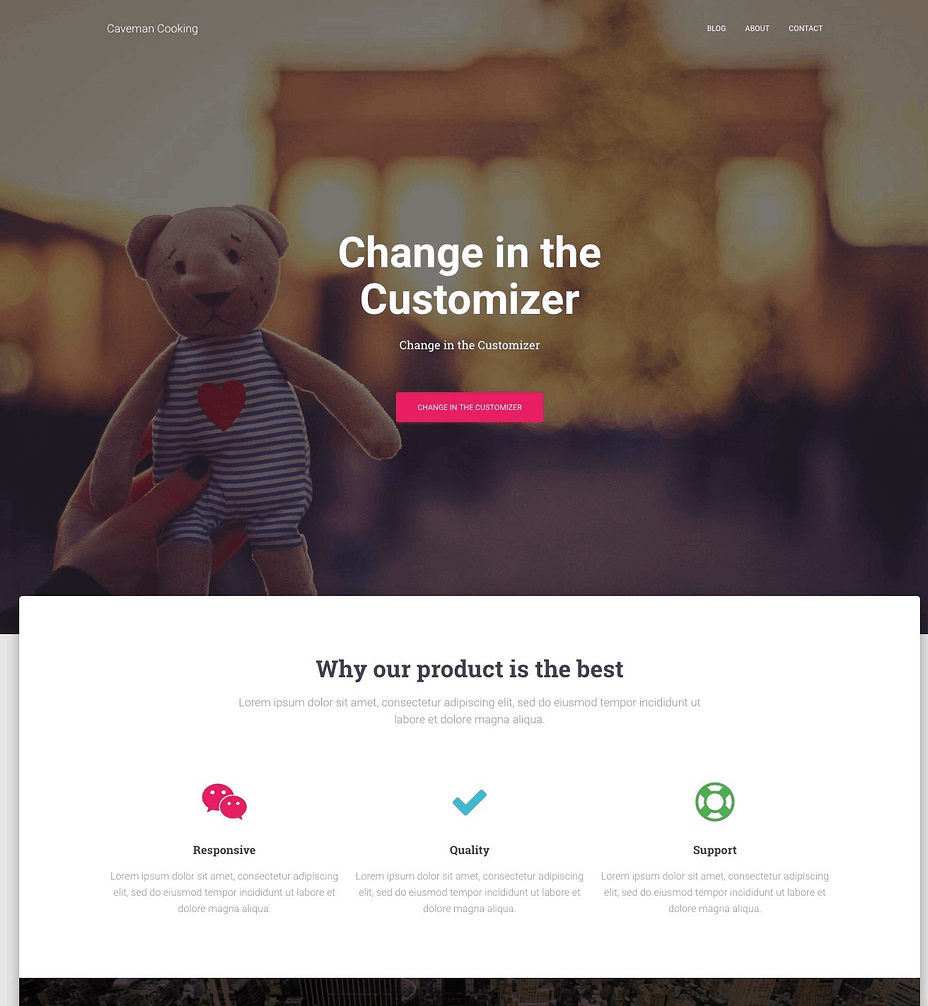
For example, this is what a WordPress website looks by default, right after the installation:

With just a couple of clicks, and with a popular free theme called Hestia, for example, we can get it to look like this:
Here's how:
a) Pick a theme that you like
As I mentioned, WordPress themes are out-the-box design packages that define the way your website looks. You can install them quickly and then change them in the future if need be.
The critical detail here is that themes don’t change the contents of your site but only alter the presentation.
There’s a huge abundance of WordPress themes out there. Just looking into the official directory at WordPress.org, there are hundreds of themes there.
But that’s just the tip of the iceberg. There are a lot more free themes on the web on third-party sites, and there’s also a whole other world of paid themes that are distributed by independent theme stores and even theme marketplaces.
Even though there are myriads of paid themes out there, for most users, free themes are a great option to start with. The surprising thing about some of the best free themes is how many impressive features they bring to the table without asking for anything in return.
So, how to pick a theme that’s right for you? Here are some tips if you want to give this a more in-depth look. Generally, though, you don’t need to spend too much time on this and go a simple route instead.
We can do that because the theme you choose today doesn’t have to be your final decision. You can always come back to it later on and change it in a matter of minutes.
Therefore, we’re going to go for a safe bet and use one of the most popular free themes in the market today to demonstrate how WordPress themes work. That theme is the aforementioned Hestia.
b) Install your theme
If the theme you’ve chosen is available in the official directory at WordPress.org then the only thing you need in order to install it is the theme’s name. Yep. That’s it.
Here’s how theme installation is done:
Go to Appearance → Themes from your WordPress dashboard and then click on “Add New.”
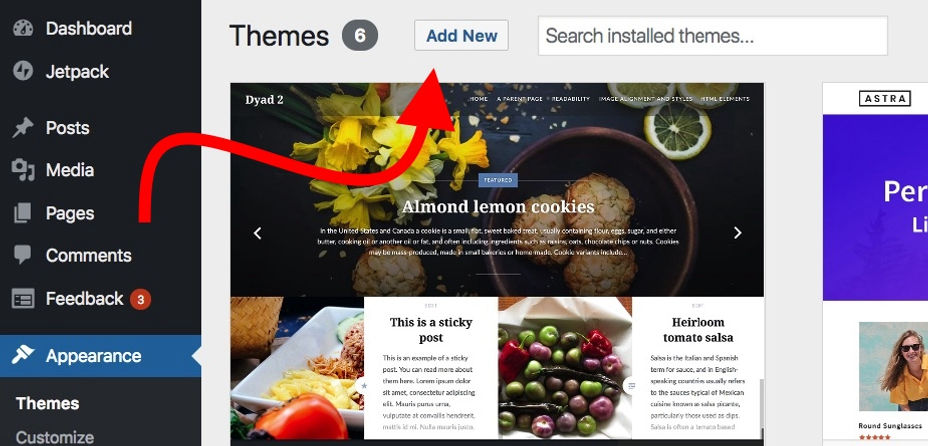
From there, input the name of the theme that you want to install, like so:

You’ll see it displayed on the list below the search field. Just click on the Install button under your desired theme:
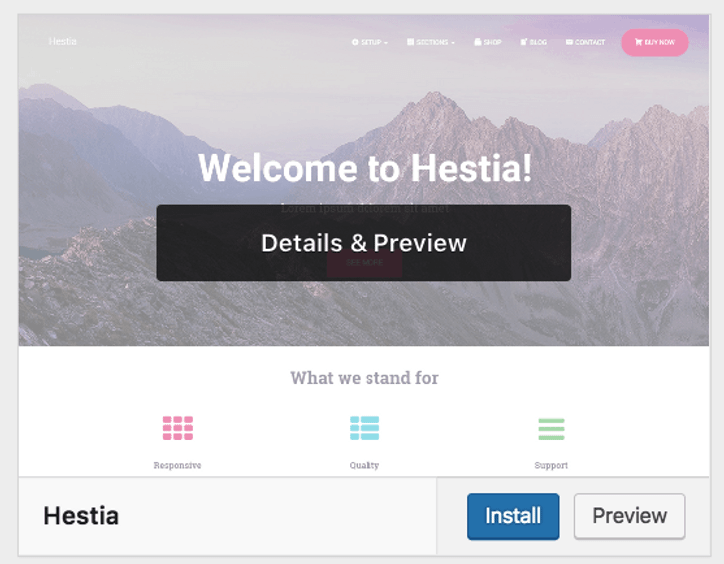
After a second, the theme will be installed. To fully enable it on your site, click on the “Activate” button that will appear in place of the “Install” button.
Hestia is one of those themes that offer some excellent onboarding for new users. To see what the theme has in store for you, click on the button from the welcome prompt.

You’ll see your main Hestia panel from which you can learn about the theme and extend its out-the-box features with some extras. Let’s do that now.
First, click on the “Recommended Actions” link to see what’s available.

Out of the options proposed there, let’s go with only “Orbit Fox Companion” for now. Just click the “Install and activate” button.
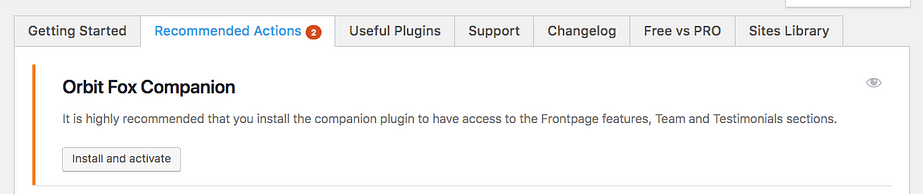
Orbit Fox is a nice addition to Hestia as it delivers some cool features to upgrade your site’s looks. For instance, you get some useful new modules for the homepage, a template directory that will be helpful when building your sub-pages (such as “about” or “contact”), and custom menu icons.
At this stage, your new theme is active on your site. You can see it in action simply by going to YOURWEBSITE.com.
Though, what you’re seeing there is far from the theme’s potential. Right now, we’ll take care of adapting the design, menus, and other elements to make the site look exactly like you want it. Here’s how:
c) Customize the theme
While the out-the-box look of your theme might be already quite nice, you should still do some basic customizations to make it fit your needs hand-in-glove.
To begin, go to Appearance → Customize. You’ll see the main WordPress Customizer interface.
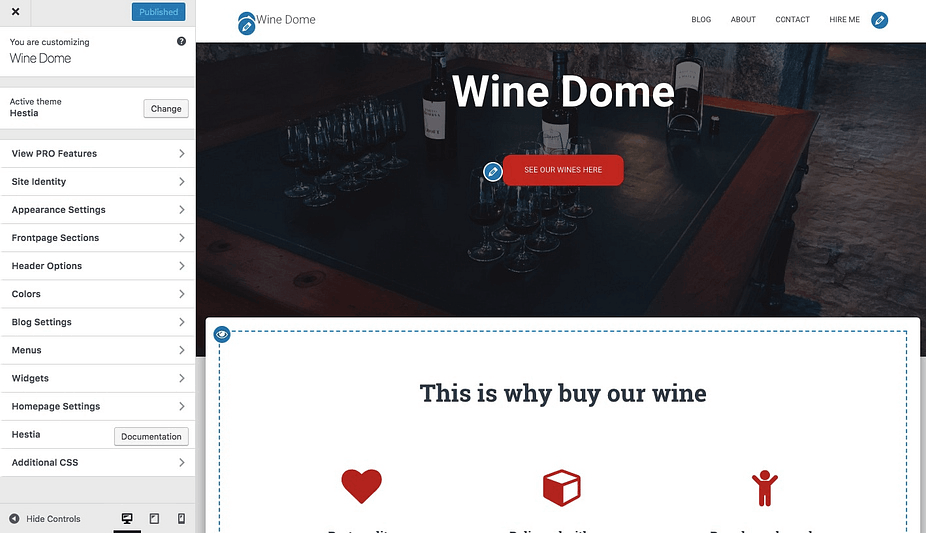
From there, you can fine-tune a load of things. We’ll start with the homepage, since it’s the most representative.
This text is set by default and is suitable for edit in real time. By default the drag and drop core feature will allow you to position it anywhere on the site. Get creative & Make Web.
Setting up your homepage.
Do the following:
1) In the sidebar, go to “Homepage Settings.”
2) Select the option, “A static page” under... LEARN MORE
Plugins are to your WordPress site what apps are to your iPhone.
In other words, they extend the standard functionality of your site by adding some much-needed features. Essentially, as you’re figuring out how to make a website on your own, plugins are how you can get some great features without knowing any coding.
Here are the plugins you should consider getting – best of all, they are all free:
• Yoast SEO – helps you make search engine optimization tweaks and make your site more accessible to the search engines in general.
• Google Analytics for WordPress – this one integrates your website with the most popular traffic analysis solution on the web.
• Wordfence Security – improves the security of your WordPress site.
• UpdraftPlus – does automatic backups of your website.
• Optimole – optimizes your images.
• WPForms – lets you add interactive contact forms to your website, which your visitors can use to reach you directly – much better than displaying your email in plain text on your site.
Installing plugins is simple. If it’s a free plugin that we’re dealing with, then all you need is the plugin’s name.
Go to your WordPress dashboard and then to Plugins → Add New. From there, input the name of the plugin that you want into the search field, and then click on “Install” and “Activate.”
There are some pages that all websites should have, regardless of their purpose or goal.
But first, how to even create a page in the first place:
To do that, simply go to your WordPress dashboard, and then Pages → Add New. You’ll see this screen:
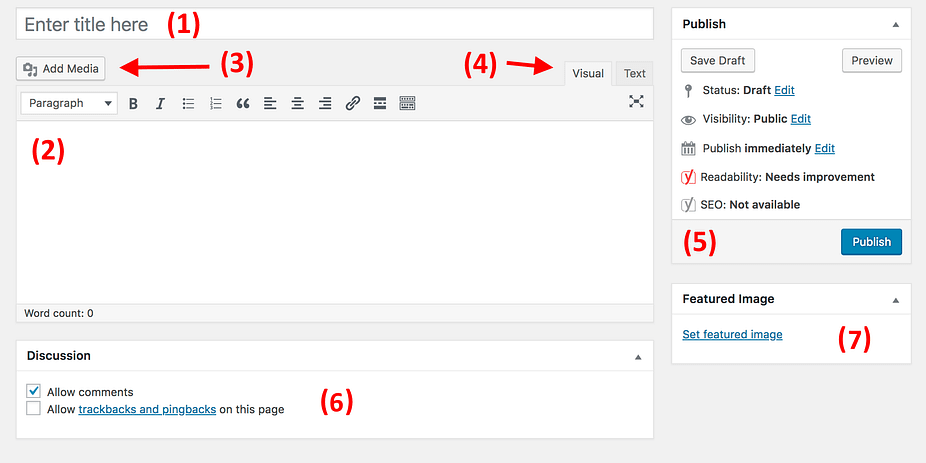
(1) A place for the headline of the page.
(2) The body section – the main content of the page. The interface is very similar to MS Word. You get all the basic text formatting features (like bold, italics, aligning text to left/right/center, creating lists, etc.).
(3) You can add... LEARN MORE
A blog (as well as marketing through content – aka “content marketing” in general) is among the most effective ways to promote not only your website but also any products that you might want to sell through that website.
And it’s not just me saying this; there’s raw data proving that blogs are a superior tool for marketing online, with 55% of marketers saying that blogging is their top inbound marketing priority.
Running a blog is a straightforward concept. What you do is publish articles related to the topic of your website and do it regularly.
From a technical point of view, WordPress has blogging tools built right into it from the get-go. In fact, WordPress started as a blogging platform.
To create a new blog post, all you need to do is go to Posts → Add New (from your WordPress dashboard).
The process itself of creating a blog post works nearly the same as creating a new page. The editing panel looks nearly the same (the screenshot below), and the options are mostly the same as well.
One of the few differences is that you can also assign your posts to categories and tags.
- This is what adding a new blog post looks like:
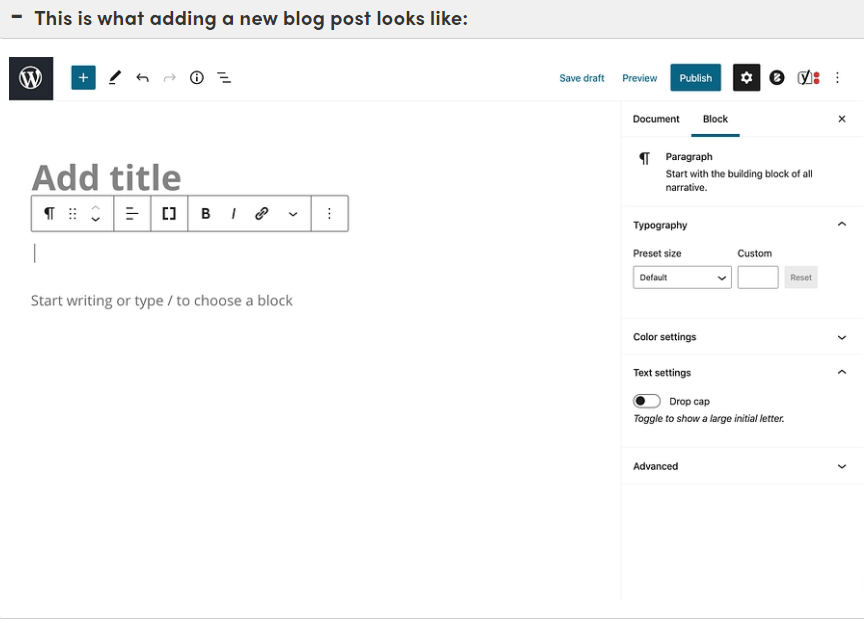
Once you’re done working on a blog post, click on... LEARN MORE
With all your key pages online (and perhaps your blog started as well), it’s now a good moment to adjust your site’s navigation and make it overall easier to consume for the visitors.
We’ll focus on two elements here:
a) Menus
Menus are the primary vehicle through which visitors navigate your site, thus they’re crucial when figuring out how to make a website.
Depending on your theme, you will have a couple of options to choose from regarding menu settings. Here’s what you can usually do (on Hestia’s example):
First, go to Appearance → Menus in your WordPress dashboard.
You’ll see this default panel:
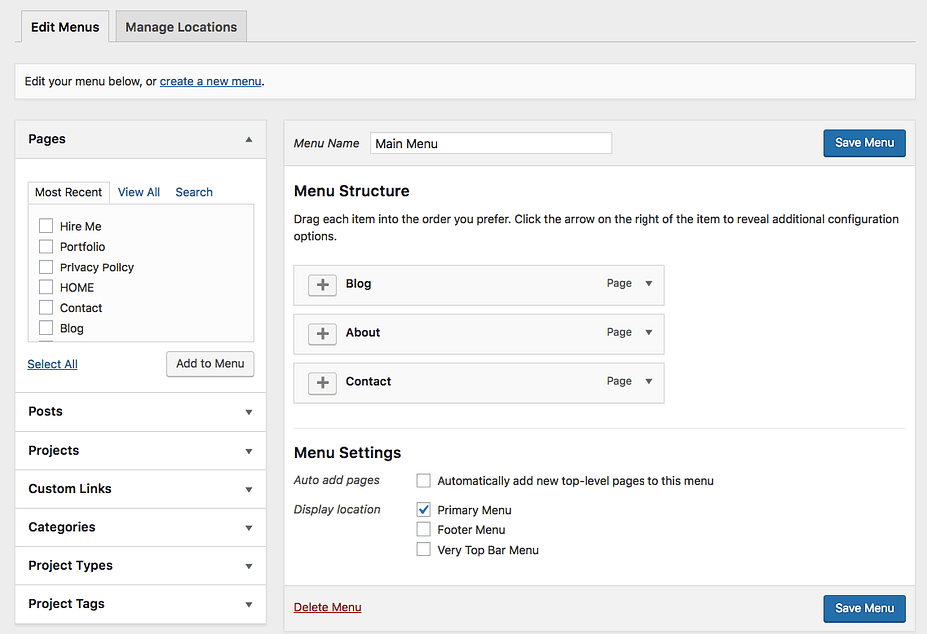
To the left, there are all the pages you can choose to add to a menu. To the right, you can see the menu structure itself and all its settings.
Let’s start by selecting a couple of key pages and adding them to the menu. A good idea is to pick About, Contact, plus whatever other one or two pages you consider to be important, and add them to the menu.
The great thing about this whole panel is that you can drag and drop the menu items to reorder them.
When you’re done, select the menu location at the bottom. Usually, selecting the location labeled “Primary Menu” will result in showing the menu in the top section of the website. This is probably what you want for your main menu. Click on “Save Menu” to save the settings.
Note. You can create additional menus as well. Just click on the “create a new menu” link that’s visible in the screenshot above. This will show you the same menu creation panel. Each menu needs to be displayed in a different location. So, for this new one, you can assign it as the “Footer Menu.”
When you go to your site now, you’ll see the menu in place.

b) Widgets
Widgets are an old-school feature in WordPress. In simple terms, a widget is a small block of content that can be displayed in various places around the website.
The usual placement of those blocks is in the sidebar or the footer of the site.
To see what this might look like and to set your widgets, go to Appearance → Widgets in your WordPress dashboard. You’ll get this screen:
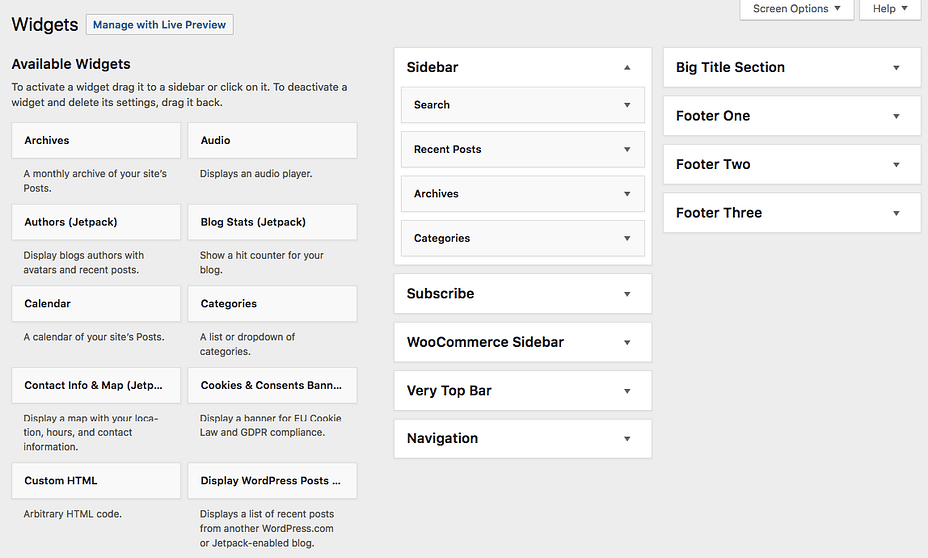
The Hestia theme offers a number of widget areas apart from the sidebar or the footer, but let’s not focus on those additional placements for now.
To add any widget to a widget area, just grab it from the left-hand side and drag-and-drop it onto your chosen widget area on the right.
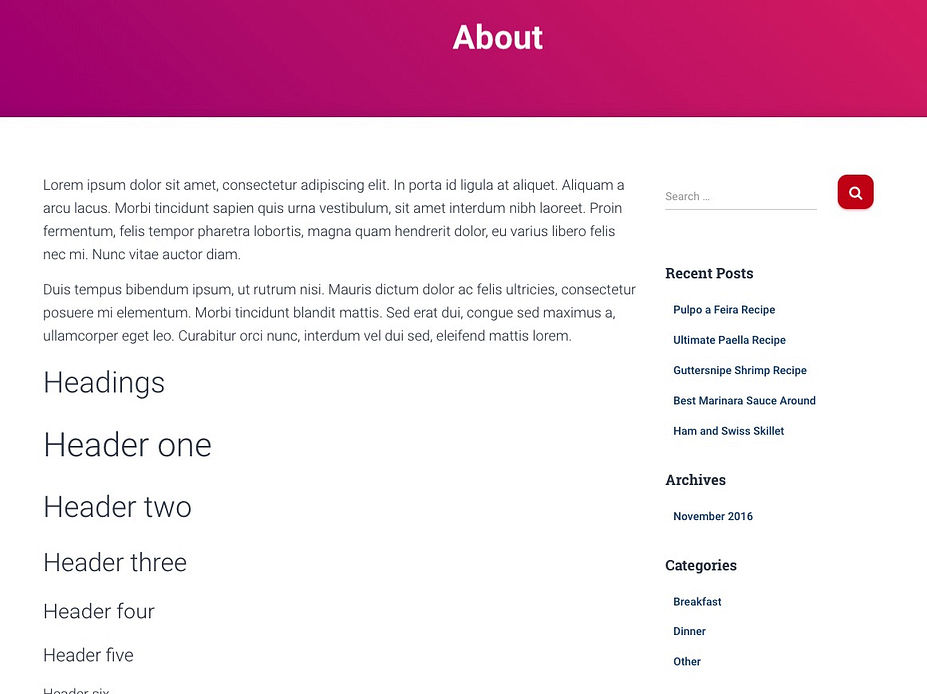
For instance, as you can see, on my site, I have Search, Recent Posts, Archives, and Categories in my sidebar (screenshot above). Here’s what those widgets look like when I go to my About page, for example:
After you’re done with your widgets and navigation, congratulations! Your site is basically ready for the world to see!